Livery Editor
The Livery Editor is a menu located in the Mission Editor tab in the bottom right corner of the first screen and is used for uploading liveries for player aircraft.
Livery Menu
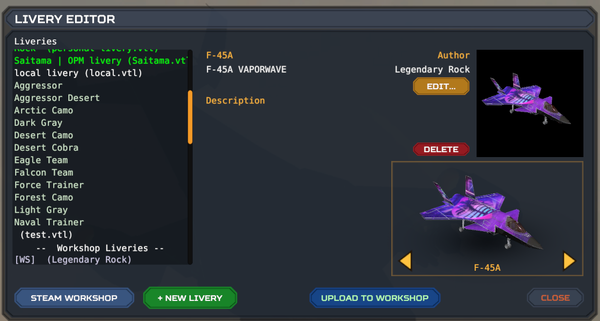
On the left, is a list of currently installed liveries. The liveries in a bright green color are custom local liveries (.vtl files). The liveries in the de-saturated green are the default liveries that are included with the aircraft. The faded blue liveries are liveries downloaded through the steam workshop. When any livery is selected, a preview of it will appear in the bottom right corner.
While having a local livery selected, you can preview the liveries name and description. (Note that the name is not the same as the local livery filename) You can also upload the liveries and edit them from this menu.
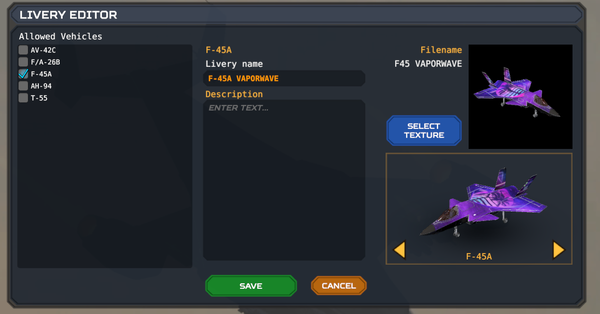
In the Edit menu you can change the name, description, the texture and what aircraft you can select this livery for.
Creation and Upload
Textures have a maximum file size of 10mb and a recommended image size of 4096x4096. Model references for the AV-42C, F/A-26B and F-45A are located under Steam\steamapps\common\VTOL VR\LiveryReferences.
The model references for the AH-94, T-55 and EF-24G are located under Steam\steamapps\common\VTOL VR\DLC, under the folders 1770480, 2141700 and 2531290 respectively. Note that these model references are in the .fbx format and also contain an exploded version.
Once you have your .png or .jpg file, put it in Steam\steamapps\common\VTOL VR\EditorResources. Press +NEW LIVERY, in the first livery menu, then select the aircraft it's designed for and select the texture. After giving the livery a name, description and texture, you can now select it in-game by pressing the Liveries button while in a mission's spawn room in multiplayer or the armament selection room in single-player. Local liveries do not appear for others and only you. To fix that, hit UPLOAD TO STEAMWORKSHOP.
The most commonly used software is for creating liveries is Blender, a free vfx, modeling, texture, animation tool and Substance Painter, a paid 3D painting software by Adobe. Here is a video tutorial for making liveries in blender by Hackerkm.
Item Visibility
- Public: Anyone can search, download and see the livery.
- Private: Only specific people can download and see the livery.
- Unlisted: Anyone can download and use it, but it cannot be searched up unless a link to the livery has been made available.
- Friends Only: Only your friends can download and see it.
Custom Thumbnail
By default, a livery uploaded to the workshop will include a low resolution picture of the aircraft. However, if the uploader wishes to include a proper workshop thumbnail image, it can be done as follows:
- Create an image in a 1080x1080 resolution.
- Create two versions of the same image:
thumb.pngandimage.jpg. - Inside the livery editor, click on upload but do not upload the livery yet.
- Go to the folder of the livery that is to be uploaded under
VTOL VR\CustomLiveries\<filename>. - Click/drag both of the new
thumb.pngandimage.jpginto that folder. - Replace both files and upload the livery.


